Armored Core V - Operator (Know your ROLE!)

3 posts / 0 new
Last post
#1 Sat, 03/10/2012 - 17:48
PoltegIce's picture
Offline
Last seen: 8 years 6 months ago
Joined: 10/25/2006 - 23:00

Armored Core V - Operator (Know your ROLE!)

Found this online. Made by people like us having played the demo so probably room for improvement in this guide but its a start.


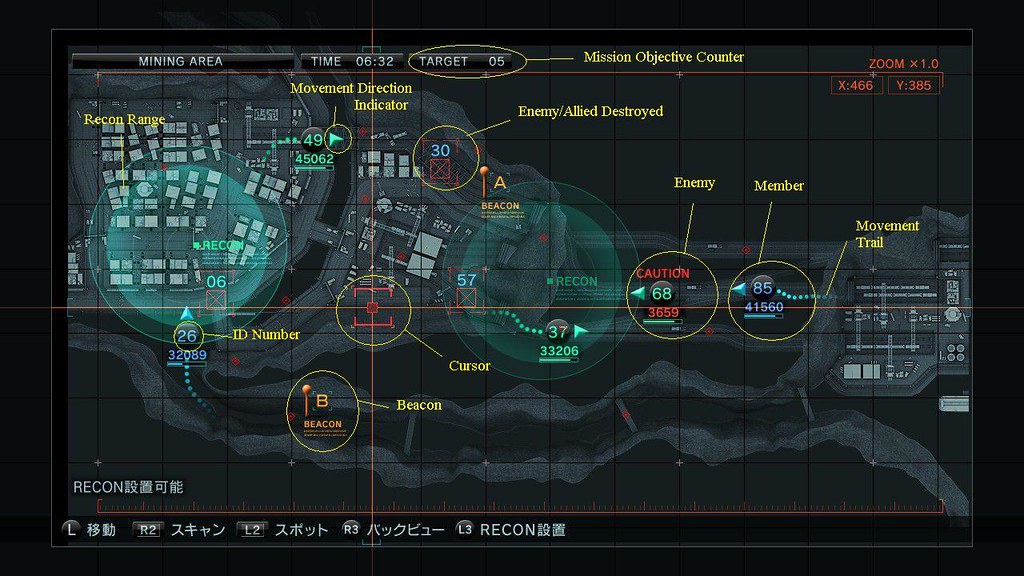
BEACON – The key instrument of the Operator, the Beacon is a point marked on the map by Operator denoting some sort of important point. It can be used to indicate where your Allies should go, mark approximate positions of enemies, and much much more. You have four available.


CURSOR – What you’ll be using to navigate the map, scan, and placed recons.


ENEMY – The title says it all. Usually, the enemy should be marked in red instead of green as shown in this image. Enemies can only be seen in recon range, and are invisible to the Operator otherwise.


ENEMY/ALLY DESTROYED SYMBOL – When an enemy or ally is destroyed, it will show a square with an X in the middle to mark its position.


ID Number – Assigned to each unit, this is what you use to identify each person. Its faster to say “07 move to point Bravo” than “SUPERKING move to that point” and lets you tell the difference between everyone. This can be changed if you wish. Merc’s are identified as M and a number between 1 and 4


MEMBER- Your ally, they will appear in green or blue.


MISSION OBJECTIVE COUNTER – Usually this will tell you what you need to do. For instance, if your target is to destroy 12 targets or do 250,000 AU of damage, it will be kept up to date here. Time is also kept just left of it.


MOVEMENT DIRECTION INDICATOR – A small circle on each AC, it indicates which direction an AC is facing.


MOVEMENT TRAIL – shows the approximate trail movement of an AC.


RECON RANGE - The giant blue circle is the total recon range of any given deployed scan mode or recon unit. You can not only deploy recon, but also see the recon range of your ally ACs when they enter scan mode and you can see anything they see. It shows enemy AC in that area, their orientation as well as other enemy units and their firing ranges and arcs. We will go in depth on that later.


Not Pictured
Enemy units (Non-AC) - Enemy units will appear as icons on the screen. The icon will be proportionally in size to what they are in the game. Therefore, a huge missile silo will be a larger icon than the sniper MT. Remember, they are only available if they are within the recon range. If you are defending a territory and have units stationed there, they will also appear the entire time.


Controls


Triangle, Square, X, Circle - these four buttons are your beacons, A, B ,C and D.
L2 – Marks a target. You can only mark one.
R2 – When the cursor placed over an enemy, it will give a detailed reading of the ACs stats.
R3 – When the cursor is placed over an ally, it will bring up a small camera of what that ally sees.
L3 - The recon unit deploy button. When used, a small area of the map and any enemies in that area can be seen. Ally ACs can see it as well if in scan mode. After initial deployment, it lasts approximately 10 seconds. Use carefully: even though you have an unlimited number it takes up to 10-15 seconds to charge and use again, meaning careless use will leave you blind for periods of time.
Control Sticks – Movement
Directional Buttons – Zoom and unzoom from map
Select - ???
Start - ???
L1 – Holding this while moving the right and left joystick will make the cursor move faster.
R1 - This is the Ally AC Overview and will bring up this screen when pressed.

 

Sat, 03/10/2012 - 17:51
PoltegIce's picture
Offline
Last seen: 8 years 6 months ago
Joined: 10/25/2006 - 23:00

You actually share vision with all recon units deployed on the field at all times, whether they're in scan mode or not. This is why it's incredibly important for all your team members who can bring recon units to bring them and actively use them. There are different types of recon units and they benefit the operator differently.


The orbiting (follow) type recon units grant the largest scan range at a whopping 300m and follow the AC around, but they also have the lowest duration and you can obviously only have one out at a time. This lets the operator see nearly a full scan radius (operator special scan radius) around the AC that has one orbiting above its head. These should be equipped by default if you have the weight space to equip them on every single AC and they should be actively used at all times. They're the simplest and easiest to use for players. Fire and forget style.


The next two recon unit types require more work to use properly in favor of the operator rather than just the AC pilot. These two are sticky type recon units and floating type recon units. Floating type units have the longest duration (by enormous margins) but also have the tiniest range. They clock in at about 100m scan radius. Floating type are released straight out of your AC's butt and do not move from that location. Sticky type are launched from your AC like a bullet and will stick to whatever solid surface they come into contact with. Sticky type have about 150m scan radius and have about double the duration of orbiting type recon units. What's important to note is that sticky type can have roughly three units out at once, which grants a lot of vision. What is even more impressive is that the floating type can maintain up to five on the map at once, which is an enormous amount of coverage.


Do you actually get more raw space covered by using the floating/sticky type? No. The orbiting type actually gives the most cubed space covered, but the orbiting type is totally focused on one spot. The sticky and floating can be placed in key points where you don't need a 300m radius and be spread out, granting vision of more important areas at all times. Both sticky and floating type recon units are much harder to use effectively to the advantage of the operator and AC pilot at the same time compared to orbiting (follow) type recon units. Effective and skilled or trained pilots should consider using either sticky or floating type recon units, barring they are not playing a close combat or highly maneuverable AC. Close combat and highly mobile ACs should nearly always bring orbit type recon units, unless they are purposefully playing a recon and harassment role. In those cases it is best to use floating type recon units and some form of ranged chipping weaponry like a sniper rifle.


I can not stress this enough, though. Always, always, always use your recon units in combat. It is immensely helpful to the operator because they're not required to scan every damn inch of the map. The operator, by default, can only see what your ACs see. What your ACs see. Visually. So if an opponent runs behind cover the operator loses vision of them too unless you have recon units out or if they scan that location. While the operators scan is large and mildy spammable, it is not spammable enough to cover an entire team who doesn't use recon units.


--------------------------------------------------


L2 button is something everyone can use, including normal players. L2 marks a target, be it turret, MT, or AC. The target is marked with your emblem and number and everyone can see it. This is normally used by players to call out targets they are focusing on. The operator normally uses this feature to call out targets they want the entire team to focus fire, for whatever reason.


R2 button is also something everyone can use, though it changes for other players depending on their control scheme since they're actively on the field. The R2 button is how you select a target to get detailed information on them. The same as in scan mode. It's your RIGHT ARM ACTIVATE button in a default control scheme. Put your cursor over a target and press R2 to get a detailed readout on their AP, defenses, weapons and ammuntion, etc.


R3 button is for the operator only. With R3 you are able to put your cursor over your own allies and then hit R3 to watch their screen in combat. It's very good for keeping really boring and slow matches from being mind-numbing. It can also be useful for when your team is chasing someone, as it allows you to share one persons camera vision so you can give more relative directions like left, right, forward, behind you while also being able to still see with your operator scan vision. Just be sure to make sure you identify who you are giving relative directions to or you may confuse the entire team.


L1 can be held down to make your cursor move around the map faster. This is useful when you have to ping multiple spots at once or pull up info for multiple enemies in rapid succession. It becomes required if your team is having spread out fights all over the map.


I honestly cannot recall what the select and start button did, though I remember at least one of them being useful. I guess I'm just having a brainfart right now.


--------------------------------------------------


Ok, so about AC classes. They're all sort of designed for specific roles in ACV. Not very specific, but more specific than in any previous AC game by a long shot. You can no longer expect a class of AC to deal with all other classes of AC, no matter how hard you try. It's not fully against you, but the battle is gauranteed to be uphill. Much like some weapons are just really terrible vs some ACs due to the defense system.


LW bipedal and RJ ACs are not capable of being straight killers anymore. You can still kill some AC types with them, but they're generally better at harassment and crowd control than they are at killing. Most ACs that you can kill with a LW of either kind will probably have an easier time killing you back, assuming they're of a relatively equal skill level. RJs can jump higher and carry more, bipedals can turn faster and have more energy. They both focus on harassment type play, being scouts, and killing specific AC types. Mostly other LWs and quadrupeds. If you attempt to use a LW of any kind as a main source of damage or some kind of anime style super murderer assassin you will likely die pitifully. They are pinpoint killers and hard pressure/harassment when used correctly. Their design is so that they can come swooping out of nowhere and help stunlock targets, kill people who aren't paying attention (such as sniping quads), or destabilize the opposing teams positions.


MW ACs are best described as relatively mobile, capable of effective damage output potential and variety, and very good at stopping KE damage. They're ideal at both fleshing out teams and taking out stationary defenses. That's really one of their primary goals, to take out defenses and flesh out teams. They're not actually very good at anything specific, but they're very capable of handling most things. They're incredibly good at killing LWs and quadrupeds of all kinds and decent against HW RJs. They are not quite so good at killing well set up HW bipedals and should avoid tanks at all costs.


HW biped and RJ ACs are mobile weapons systems. Their sole purpose is to bring mobile heavy weaponry to the field. Their defenses help them survive while under all of that weight stress, but are not capable of sustaining them with any kind of magic defense gouging. They still have one weak defense, unless they sacrifice gouging two defenses. In which case they open themselves up even worse to the actual ACs designed to kill them. HW ACs are very good at breaking stationary defenses and killing LWs, other HWs, and tanks. They stack up poorly to a properly equipped and setup MW or quadruped.


The LW, MW, HW bipedal and reverse joint classes form the core of an offensive team. Defenders in the game of ACV have an enormous advantage in local areas, but not in a full game state. Mobility is very important to winning an invasion when paired up against a highly capable team who uses custom turret layouts (as my team did). A well designed offensive team with a good operator can crack a solid defense by sidestepping their opponents strengths and attacking their opponents weaknesses. Learning how to sidestep in ACV is a big deal for offensive teams. Sidestepping is the act of identifying a position or point of strength in the opponent and simply avoiding it. ACV allows this in both opponent mobility, stationary defense, and even in their AC's actual defense stats. This doesn't mean that quads and tanks don't have a place in offensive teams, it just means they're not the core of an offensive team.


Quadrupeds are low mobility weapons systems. They're best fit with cannons and sentry guns and best on the defense. They have incredibly fast refire rates for their weapons, due to high stability, and can put out extreme damage at range. Their point of speciality is killing HWs and tanks, which are unable to dodge their rapid cannon fire and normally unable to escape the resulting stunlock. They specialize most extremely in killing tanks, which do not have the ability to fight back at extreme ranges and do not have the mobility to avoid their cannon fire for long. They're not very good against LWs and MWs, especially due to LWs ability to force them out of position. Note that setting up a line of defense around your quadruped with sentry guns goes a long way to keep LWs and MWs away from you.


Tanks are the end-all be-all solution to raw firepower. Their singular purpose is to put into play immense amounts of damage from multiple damage types. Tanks are best used on the defense and also benefit from sentry turrets, though not as much as quadrupeds. Their enormous defenses and AP make it possible to survive through almost any kind of standard aggressor weaponry as long as they are not stunlocked. More importantly, they are highly capable of killing mobile ACs due to their grounded turn speed bonus, ability to wield extreme damage weaponry, and absurd potential weapon variety. Tanks are basically good at killing anything they can reach. This has some downsides though. They have to be able to reach their opponents. Tanks are notoriously terrible at moving around the map, can not wall jump, and can not zoom in with cannons. This means they must seek to avoid long ranged combat of all types as much as possible. Their low mobility also makes them poor aggressor choices without a proper team and operator to support them.


Quadrupeds and tanks form the core of a defensive team. They allow your team to use the benefits of local defenders advantage, which means not having to always sidestep your opponents strengths and having support fire from turrets. They also have the load capacity to bring wildly outrageous amounts of damage and damage variety, which helps avoid issues with the opponents defense ratings. This doesn't mean that other AC types aren't useful in a defensive team, but that they don't form the core of the team.


Remember, these roles aren't set in stone for AC types, but they are things that the ACs are distinctly good at and for a team to be well balanced it should try to flesh out their teams while following these general guidelines. At least for the current state of balance.
 

Sat, 03/10/2012 - 17:52
PoltegIce's picture
Offline
Last seen: 8 years 6 months ago
Joined: 10/25/2006 - 23:00


From what I can tell, your team needs 50000 "team points" (チームポイント) [viewable from the team menu] to attack a territory and regardless of winning or losing you lose 50000 team points.


Join our Universe

Connect with 2o2p